Your suitcase is zipped, the Uber’s outside — and you realize the reef‑safe sunscreen and waterproof phone pouch aren’t in it. Cue panic. A beach vacation packing list printable would’ve saved the day.
Missing tiny essentials spirals fast: sunburn that ruins day two, a soggy phone, or paying resort prices for basics you already own. Overpacking isn’t better either — baggage fees, shoulder strain, and a messy room where nothing’s easy to find.
Here’s the thing: you’ll get an activity‑based plan, what to buy before versus at the destination, and a one‑page beach vacation packing list printable you can use right now. By the time you finish, packing will feel simple — first up, the water.
Swimming Essentials You’ll Actually Use
What actually matters once you’re in the water? The truth is: comfort, visibility, and sun protection beat flashy gear every time. Choose chlorine‑resistant swimwear, a UPF 50 rash guard, and low‑profile goggles that seal without pressure — swims feel longer, easier, happier.
Picture this scenario: you wade in, goggles fog instantly, board shorts balloon, and the phone pouch seeps at the seal. Fifteen minutes lost, plus a headache. A few tested picks — silicone‑skirt goggles, a tight roll‑top dry bag, and a microfiber towel that actually dries — prevent the chaos. For personal skin or medical concerns, check with your dermatologist or pediatrician.
💡 Pro Tip: The American Academy of Dermatology recommends broad‑spectrum SPF 30+ and reapplication every 40–80 minutes per the label. Pair sunscreen with a UPF shirt to cover high‑burn zones.
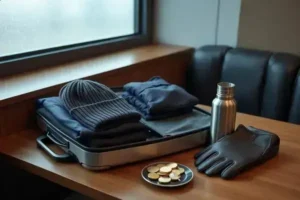
Quick‑grab kit — light, compact, ready.
- UPF 50 rash guard and fitted, chlorine‑resistant swimwear
- Silicone goggles + anti‑fog drops
- Waterproof phone pouch + 5–10L roll‑top dry bag
- Microfiber towel, water shoes, electrolytes
| Gear | Best For | Why It Matters |
|---|---|---|
| One‑piece or lined board shorts (chlorine‑resistant polyester) | Lap swims, surf lessons | Less drag, holds shape, reduces chafe |
| UPF 50 rash guard (long/short sleeve) | Midday sessions, fair skin | Blocks ~98% UV — coverage sunscreen misses |
| Low‑profile silicone goggles + anti‑fog | Pool and open water | Wide view, reliable seal, fewer leaks |
- Apply SPF 30+ 15 minutes before swimming. Cover ears, tops of feet, and back of knees. Add SPF lip balm — it’s easy to forget.
- Prep goggles: wet lenses, add one drop of anti‑fog, swish lightly, then seat the skirt against dry skin. Strap sits at eye line, not mid‑skull.
- Secure tech: place your phone in a rated waterproof pouch, do a 60‑second tissue test, then stow it inside a roll‑top dry bag.
- Gear up smart: wear the rash guard and water shoes for rocky entries. Kids near surf? Use a U.S. Coast Guard–approved Type II or III life vest.
- Stage the exit: clip your towel to the bag, pack a small rinse bottle, and keep a breathable wet bag for the suit after swimming.
But there’s one detail most swimmers overlook until it’s too late — what you do after the water can save tomorrow’s session from sting and fatigue…
Sunbathing Setup And After-Sun Care
Want to enjoy the sun without the sting later? Here’s the thing: a smarter setup — shade first, SPF second, timing always — beats sunbathing longer. You feel cooler, spend less, and skip the lobster look.
Think layers of protection. A UPF 50 umbrella or cabana blocks ultraviolet rays at the fabric, while a broad‑spectrum SPF 30+ handles what bounces around. Check the “water resistant 40 or 80 minutes” claim — that wording is defined by the U.S. Food and Drug Administration, so it actually means something.
⚠️ Important Warning: Sand can reflect up to about 25% of UV and water adds more glare. According to the Skin Cancer Foundation, shade and clothing plus sunscreen is the safest combo, especially from 10 a.m. to 4 p.m.
| Shade Option | Best Use | Why It Matters |
|---|---|---|
| Vented UPF 50 Umbrella (6–7 ft) | Solo or couples, light breeze | Quick to set, vents reduce lift, easy angle to chase shade |
| Pop‑Up Beach Tent (UPF 50+) | Kids’ naps, privacy, midday UV | Three‑wall coverage cuts side glare and heat buildup |
| Cabana/Canopy with Sand Anchors | Families, all‑day setups | Stable footprint, adjustable sides for moving sun |
In practice: you arrive at 11:15 a.m., UV index is high, and the breeze is picking up. You angle a vented umbrella 15° against the wind, throw on a breathable UPF shirt, then apply mineral sunscreen to exposed skin. Result — less squinting, fewer hot spots, and a cooler core temperature.
After‑Sun Care That Actually Works
- Cool it down: take a 5‑minute lukewarm rinse — not icy — to stop residual heat. Don’t scrub; pat dry.
- Rehydrate skin: use a fragrance‑free moisturizer with aloe or soy. Skip benzocaine/lidocaine; they can irritate sun‑stressed skin (Skin Cancer Foundation).
- Seal the deal: add a thin layer of ceramide or petrolatum‑based cream to lock water in, especially on shoulders and shins.
- Drink smart: water plus electrolytes helps your body recover fluid losses faster than water alone. Avoid heavy alcohol for a few hours.
- Cover tomorrow: wear UPF clothing and a wide‑brim hat the next day. Treat pink areas with extra shade and gentle care.
What actually works might surprise you — the right reef‑safe sunscreen and underwater gear change everything once you’re off the sand…
Snorkeling And Reef-Safe Must-Haves
Dreaming of clear fish and calm breaths? Here’s the thing: a great snorkel session depends on fit, buoyancy, and reef care — in that order.
Picture this scenario: you spot a turtle, but your mask fogs, the snorkel gulps water, and a loose fin strap steals your focus. Two minutes later, the moment’s gone. A tempered‑glass mask with a soft silicone skirt, a dry‑top snorkel with a purge valve, and open‑heel fins with neoprene socks fix 90% of that frustration.
⚠️ Important Warning: NOAA and Green Fins note that oxybenzone and octinoxate can harm coral. Choose mineral sunscreen (non‑nano zinc oxide or titanium dioxide), wear UPF clothing, and never touch coral — even a light kick can break living reef.
Quick Gear Decisions
| Option | Best For | Key Trade‑Off |
|---|---|---|
| Mask + Snorkel (separate) | Control, easy clearing | Most customizable fit; learn basic clearing |
| Full‑Face Snorkel Mask | Casual surface viewing | Comfortable view; check local safety guidance and fit |
| Dry‑Top Snorkel + Purge | Small surface waves | Blocks splashes; adds a little breathing resistance |
Reef‑safe must‑haves — compact and proven.
- Mineral sunscreen stick (non‑nano), UPF 50 rash guard and leggings
- Snorkel vest (adds buoyancy without heavy gear)
- Open‑heel fins + neoprene socks to prevent rub
- Defog gel used sparingly, rinsed on shore before entry
- Mesh gear bag, whistle, small waterproof pouch for ID
Get In The Water, The Right Way
- Fit the mask on dry skin, strap level with the eyes. Light inhale test — it should hold without the strap.
- Defog: apply a rice‑grain drop, rinse thoroughly, then keep interiors dry until you’re in.
- Check the snorkel: dry‑top floats freely, purge valve clear. Practice one forceful exhale to clear.
- Fins last: walk backward at the shoreline, then slide in. Stay horizontal to keep fins off the bottom.
- Use relaxed kicks: small, steady flutter from the hips. Avoid bicycle kicks — they stir sand and stress calves.
- Scan, don’t stand: float over coral, signal your buddy, and exit before you’re tired.
And this is exactly where most people make the most common mistake — they plan the swim but forget cold‑keeping snacks and sand‑proof dining for sunset…
Beach Dining And Sunset Picnic Gear
Warm drinks, sandy chips, napkins flying — you’ve lived that beach picnic. Here’s the thing: manage cold, sand, and wind, and sunset dining suddenly feels effortless.
Think in systems, not items. Cold chain first (ice retention and shade), then surface control (sand‑proof base, low table), and finally lighting. You’ll waste less food, spend less on resort snacks, and actually relax.
⚠️ Important Warning: According to the U.S. Department of Agriculture Food Safety and Inspection Service, perishable food shouldn’t sit out more than 2 hours — or 1 hour above 90°F. Keep cold foods at 40°F or below using frozen gel packs and a pre‑chilled cooler.
Essential Beach Dining Kit
- Insulated backpack cooler (20–24 can) + rigid ice packs for stable cold chain
- Sand‑proof beach blanket with corner pockets and stakes
- Collapsible low picnic table and weighted silicone clips for napkins
- Leakproof bento boxes, silicone zip bags, and a small cutting board with sheath knife
- Vacuum‑insulated bottle and stainless wine tumblers with lids
- Reusable flatware, mineral wipes for hands, and compostable trash bags
- Rechargeable LED lantern (warm tone) and a compact corkscrew/bottle opener
| Cooler Type | Best For | Trade‑Off |
|---|---|---|
| Backpack Soft Cooler | Hands‑free walk from parking | Lighter carry; moderate ice retention (6–12 hours) |
| Soft Tote Cooler | Short stays, quick access | Easy packing; limited structure for stacking |
| Rotomolded Hard Cooler | All‑day events, hot climates | Best ice retention; heavy and bulkier to haul |
In practice: you claim a spot 30 minutes before sunset, wind at your back. The sand‑proof blanket anchors with pockets, the low table keeps food off grit, and the pre‑chilled backpack cooler opens just once for the main spread — everything stays cold and clean.
Fast Sunset Setup
- Pick high ground above the last wet line; check local tide info (NOAA is a solid reference).
- Face the umbrella or cabana as a wind break; clip napkins and a light tablecloth.
- Stage the cooler in shade; open briefly, keep drinks in the top layer, proteins at the bottom.
- Plate smart: lids on between bites, bento compartments for produce, knife and board for last‑minute slicing.
- Light the scene with a warm LED lantern at knee height — enough glow, no bug frenzy.
But there’s one detail most planners skip — knowing what to pack at home versus buy at the beach can slash weight and cut costs…
What To Buy Before You Go Versus At The Destination
Trying to save luggage space without paying tourist prices on basics? Here’s the thing: pack essentials that are brand‑sensitive or fit‑critical, and buy bulky, commodity items when you land.
What decides the split — flight rules and local access. TSA’s 3‑1‑1 liquids rule caps carry‑ons, while many destinations now restrict certain sunscreen chemicals. The State of Hawaii and some marine parks favor reef‑safe mineral formulas, so planning ahead protects both your skin and the water.
💡 Pro Tip: For carry‑ons, TSA’s 3‑1‑1 rule allows liquids, gels, and aerosols in containers up to 3.4 oz (100 mL), all inside one quart‑size bag. Medications and baby formula have separate allowances — check TSA guidance before you pack.
| Item | Buy Before (Why) | Buy There (When It Makes Sense) |
|---|---|---|
| Reef‑safe mineral sunscreen | Ensure non‑nano zinc/titanium and a formula your skin tolerates | Carry‑on space tight? Grab sticks or tins at a local pharmacy |
| Travel‑size toiletries (3‑1‑1 kit) | Avoid airport markups; keep routine consistent to prevent irritation | Condo/hotel provides basics or you’re checking a bag anyway |
| Snorkel set | Prescription mask or 2+ snorkel days; hygiene and perfect fit | Casual one‑time use — rent from a reputable, PADI‑affiliated shop |
| Beach chairs & umbrella | Driving road‑trip only; known comfort preferences | Flyers: rent on the beach; no baggage fees, less hauling |
| Cooler & ice packs | Soft cooler if you’ll reuse often and have trunk space | Buy an inexpensive foam cooler and ice at the grocery |
In practice: a family of four flies carry‑on only. They pack mineral sunscreen sticks, a TSA‑compliant toiletry kit, and a prescription mask. At the destination, they rent chairs and an umbrella, order ice and fruit from a supermarket, and skip a $60 baggage fee — stress down, savings up.
Smart Pre‑Trip Bundle (Light And High‑Impact)
- TSA 3‑1‑1 kit: travel bottles, toothpaste, and saline
- Mineral sunscreen sticks + SPF lip balm
- Anti‑chafe balm and hydrocolloid blister patches
- UPF 50 rash guard; compact hat that packs flat
- Electrolyte packets; small first‑aid mini (bandages, ibuprofen)
- Waterproof phone pouch you’ve already leak‑tested
The right split keeps weight low, cuts impulse buys, and respects local rules. Once you divide purchases this way, your bag shrinks, your budget stretches, and the rest of the week falls into place naturally.
Your Beach Week, Dialed In
You’ve got the essentials down: a fit‑first swim kit, layered shade + UPF + SPF with real after‑sun care, and a smart split of buy‑before versus buy‑there. That combo means fewer hassles and fewer fees. If you take just one thing from this guide, let it be: use a simple beach vacation packing list printable so you pack by activity, not guesswork.
Before, packing felt random and rushed — heavy bag, missing favorites, pricey resort runs. Now it’s clear and light. You’ll move faster, protect your skin, keep food safe, and still have room for memories. Simple steps, strong payoff.
Which swap will save you the most space this trip — packing it now or grabbing it at the beach? Tell us in the comments!
Ava Marie Caldwell is a passionate traveler, travel planning writer, and the founder of this blog — built for people who want to travel more, stress less, and actually enjoy the planning process.
After years of figuring things out the hard way — overpacking for every trip, booking the wrong accommodation, missing cheap flight windows by days, and once arriving at an airport without a printed visa — Ava decided to document everything she learned and put it in one place.
This isn’t a luxury travel blog with sponsored resort stays. Ava is not a certified travel agent or tourism professional — just someone who has taken the trips, made the mistakes, and found the systems that actually work for real travelers with real budgets and real lives.
Every article on this site is researched with care, written from genuine experience, and designed to save you time, money, and the kind of stress that ruins the first day of a trip you’ve been planning for months.
Whether you’re packing for your first international flight, planning a road trip with the family, or finally doing that solo trip you’ve been putting off — this blog was built for you.
When she’s not writing or planning her next trip, Ava is testing new packing systems, comparing flight booking tools, and trying to convince everyone that a carry-on is always enough.